Contact us for all your culinary needs

Phone Number:
(780) 289-7220
Email: bolasterscatering@telus.net

Follow us for daily tips on Twitter & the Bolsters Catering Facebook page

Friday, December 18, 2009

Brussels Sprout Hash with Caramelized Shallots

Here is a new twist on the dreaded Brussel sprout. Though one of my favorite holiday vegetables, it is often scorned. Yet this simple vegetable has such potential. Lets look at this quick and delicious dish.

Thinly sliced brussels sprouts are sautéed with shallots in this comforting hash.

yield: Makes 8 to 10 servings
  • 6 tablespoons (3/4 stick) butter, divided
  • 1/2 pound shallots, thinly sliced
  • Coarse kosher salt
  • 2 tablespoons apple cider vinegar
  • 4 teaspoons sugar
  • 1 1/2 pounds brussels sprouts, trimmed
  • 3 tablespoons extra-virgin olive oil
  • 1 cup water
Melt 3 tablespoons butter in medium skillet over medium heat. Add shallots; sprinkle with coarse kosher salt and pepper. Sauté until soft and golden, about 10 minutes. Add vinegar and sugar. Stir until brown and glazed, about 3 minutes.

Halve brussel sprouts lengthwise. Cut lengthwise into thin (1/8-inch) slices. Heat oil in large skillet over medium-high heat. Add sprouts; sprinkle with salt and pepper. Sauté until brown at edges, 6 minutes. Add 1 cup water and 3 tablespoons butter. Sauté until most of water evaporates and sprouts are tender but still bright green, 3 minutes. Add shallots; season with salt and pepper.


Monday, December 7, 2009

Eggnog - Simple, Traditional, Classic


Many Christmas traditions are over thought and overly complicated. Eggnog is most certainly a prime example of the need to make a simple process way to difficult. So hang on gan this is one of the quickest simplest and nicest recipes I have found, and I am please to share it with you care of my wife the purveyor of this fine beverage.

Eggnog! - History

Many believe that eggnog is a tradition that was brought to America from Europe. This is partially true. Eggnog is related to various milk and wine punches that had been concocted long ago in the "Old World". However, in America a new twist was put on the theme. Rum was used in the place of wine. In Colonial America, rum was commonly called "grog", so the name eggnog is likely derived from the very descriptive term for this drink, "egg-and-grog", which corrupted to egg'n'grog and soon to eggnog. At least this is one version...

Other experts would have it that the "nog" of eggnog comes from the word "noggin". A noggin was a small, wooden, carved mug. It was used to serve drinks at table in taverns (while drinks beside the fire were served in tankards). It is thought that eggnog started out as a mixture of Spanish "Sherry" and milk. The English called this concoction "Dry sack posset". It is very easy to see how an egg drink in a noggin could become eggnog.

The true story might be a mixture of the two and eggnog was originally called "egg and grog in a noggin". This was a term that required shortening if ever there was one.

With it's European roots and the availability of the ingredients, eggnog soon became a popular wintertime drink throughout Colonial America. It had much to recomend it; it was rich, spicy, and alcoholic.

In the 1820's Pierce Egan, a period author, wrote a book called "Life of London: or Days and Nights of Jerry Hawthorne and His Elegant Friend Corinthina Tom". To publicize his work Mr. Egan made up a variation of eggnog he called "Tom and Jerry". It added 1/2 oz of brandy to the basic recipe (fortifying it considerably and adding further to its popularity).

Eggnog, in the 1800s was nearly always made in large quantities and nearly always used as a social drink. It was commonly served at holiday parties and it was noted by an English visitor in 1866, "Christmas is not properly observed unless you brew egg nogg for all comers; everybody calls on everybody else; and each call is celebrated by a solemn egg-nogging...It is made cold and is drunk cold and is to be commended."
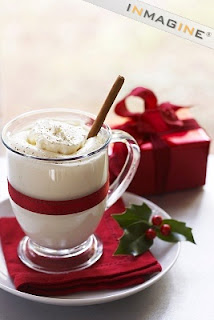

Eggnog

Beat 4 eggs

add 1 small can evaporated milk

3 cups milk

1/4 cups sugar

a pinch of salt

Combine well and simmer in a double boiler until desired consistency is met. If you find the nog if to thick after it has cooled, place in a blender and blend with milk until desired consistency.


Yields about 1 liter

Sunday, December 6, 2009

A look at Vanilla, history, uses, & storage

Vanilla is the delicate bean that lends its warm flavor to cool custard treats, soft spongy cakes and steaming coffee confections. This bean has a notable history and has long been recognized as a fundamental flavor.

The History of Vanilla Beans

Vanilla has a romantic and dramatic history that began thousands of years ago. These beans were prisoners of a war that raged among the Totonaco Indians and the Aztecs. Later when Spaniard Hernando Cortez defeated the Aztecs, the beans became his booty. Combined with cacao, the beans made a royal beverage that would be sipped by the sophisticated and enjoyed in various forms.

Today these beans are produced in several places. The island of Madagascar, located off the east coast of Africa is considered the largest producer of vanilla beans and is famed for having the sweetest beans that are distinctly creamy and smooth. Other places vanilla beans are produced include Mexico, Tahiti and Indonesia. Indonesia’s vanilla is noted for its woody essence, while the Mexican beans are described as spicy in nature. Tahitian beans are opposite the spicy variety and are said to have a fruity, flowery flavor.

What Does a Vanilla Bean Look Like?

If you haven’t baked with vanilla beans, you may be wondering what they look like. Prepared vanilla beans are dark brown, slender and pleated. They are approximately eight inches long, tough in texture, and contain thousands of black seeds.

Using Vanilla Beans in Your Recipes

Vanilla beans can be combined with other ingredients to make rich sauces and tasty treats. Hardened beans can be softened in liquid and then retrieved for use. Both the pod and the beans are useful for flavoring your favorite recipes.

How to Choose a Vanilla Bean

A good vanilla bean will be both plump and dark (almost black in color). The skin should be thin and will yield an abundance of seeds. A quick pinch will help you select the best textured beans.

How to Store Vanilla Beans

Vanilla beans are simple to store and can be kept in a tightly closed container. Used beans can be recycled and reused if rinsed and thoroughly dried. When refrigerated, these beans should last up to six months. Other forms of vanilla can be stored for long-term use as well. Pure vanilla extract, an alternative to the vanilla bean, can be stored indefinitely on your kitchen shelf. Vanilla powder, however, should be stored away from heat and light, and kept in a cool dry place.

Vanilla beans, though expensive, are well worth the cost, as imitation vanilla can contain harsh chemicals and inferior flavor.

Can I use vanilla extract instead of vanilla beans?

Of course. Many cooks and especially many cookbook writers want you to slit open a vanilla Bean and scrape out the seeds and add them (and often the bean, as well) to the dish you're making (plucking out the pod at the end). Many discerning palates find this produces a richer, fuller flavor than adding vanilla extract. It's also exponentially more expensive, and many average-Joe palates can't tell the difference.

In fact, the devil-may-care folks at Cooks Illustrated recently shocked much of the food world with the heresy that you might as well use imitation vanilla extract in your cooking as the more expensive pure vanilla extract. They argued that vanilla constitutes such a teensy part of your finished dish — and based on extensive taste tests by their super-discerning palates — that there was no appreciable difference in flavor.

Now, people who are concerned that imitation vanilla is generally made from chemically treated by-products of the paper-making industry may still have a slight inclination towards natural vanilla extract. Vanilla extract is made by soaking chopped up vanilla beans in a solution containing at least 35% alcohol, after which the solution is aged for several months. But in terms of flavor, if you can use imitation vanilla in place of real vanilla extract, you should at least feel fine about using real vanilla extract instead of vanilla beans.

Simply add a teaspoon or two of extract in place of the vanilla bean. If you are concerned that your recipe is particularly delicate and the addition of an extra teaspoonful of liquid will cause it to fail, decrease another low-flavor liquid in the recipe by the same amount.

Wednesday, December 2, 2009

Olde English Christmas Pudding With Hard Sauce Recipe

In England, no traditional Christmas dinner is complete without pudding. It is best if allowed to mature for at least two days before serving, but it can be made up to three months ahead.

Prep: 5 hrs 3 days


Ingredients
  • 1 1/2 cups raisins, chopped
  • 2/3 cup dates, pitted and chopped
  • 1 cup soft dried figs, chopped
  • 1 cup currants
  • 3/4 cup golden raisins
  • 1/2 cup brandy
  • 1 cup (2 sticks/8 oz./226g) unsalted butter
  • 1 cup dark brown sugar, firmly packed
  • grated zest of 1 lemon
  • grated zest of 1 orange
  • 4 large eggs, beaten
  • 1 cup blanched almonds, chopped
  • 3/4 cup all-purpose flour, sifted
  • 1 teaspoon ground cinnamon
  • 1/2 teaspoon ground nutmeg
  • 1 teaspoon ground allspice
  • 1 teaspoon ground ginger
  • 1 1/2 cups fresh white bread crumbs
  • For Flaming: (optional)
  • 3 tablespoons brandy

Directions
  1. Preparation time: 5 hours and 3 days.
  2. Generously grease a 2-quart ceramic or metal pudding mold with lid.
  3. Grease lid also.
  4. If using a ceramic pudding mold, make a lid with a piece of aluminum foil, 2 inches larger then top of mold.
  5. Lid will stay in place over top of mold by tying with kitchen twine or string.
  6. In a large bowl, place all the fruit and pour the brandy over it.
  7. Stir well to disperse the brandy.
  8. Cover with a towel and set aside to macerate 12 to 24
  9. hours.
  10. In a large bowl, with an electric mixer on high, beat the butter and sugar until thick and creamy. Beat in the zests and eggs. Fold in the fruit and almonds. Add the flour and spices, combining well, then fold in the bread crumbs.
  11. Spoon the mixture into the prepared mold, press down well, and level the surface.
  12. Place the well greased lid on top, securing the lid with the clasp (or if using a ceramic pudding mold, place heavy duty aluminum foil over top of mold and secure by tying with kitchen twine or heavy string).
  13. Place the mold on a rack in a Dutch oven or other large covered pot. Pour boiling water into the Dutch oven until it is halfway up the side of the mold.
  14. Keep water at a gentle boil.
  15. Steam for 4 hours, topping the boiling water to the same level when necessary.
  16. Remove the mold from the Dutch oven and set on a rack to cool. Remove lid (or foil, if using).
  17. When thoroughly cooled, rewrap pudding with freezer wax paper and foil, and store in the refrigerator until ready to serve.
  18. To reheat, steam for 1 to 2 hours or microwave on high for 4 to 5 minutes or until piping hot.
  19. For true Christmas indulgence pour over brandy and flame. Or use this recipe for traditional hard sauce:
  20. HARD SAUCE
  21. Refers to a mixture of butter and sugar that are beaten together until smooth and then flavored with extracts such as vanilla or alcoholic beverages such as brandy or rum. The mixture is then refrigerated until it hardens. Serve with plum pudding or similar desserts.

Tuesday, December 1, 2009

Making the meal what it was meant to be

Can you believe the holidays are sneaking up on us so fast this year?! I love this time of year because it means fun with family and really good food. I was just thinking of a dinner I did a few year back that was a huge success for young and old alike. The holidays can be a stressful time for all involved, especially for the kids. Whenever you host a holiday gathering remember the little ones. They are jazzed!! And why not? You are, and they take their entire perception of life from you, right?

The only difference is you don't have anyone telling you to dress right, behave and don't make a mess. During the single most exciting time in a young child's life we tend to forget how much they want to be involved in being a part of the moment. So why not take an opportunity to put a spin on tradition and try an new twist on a formal setting? You may just create some unbeatable family memories.

Have little ones help decorate the table. (Not-so-little-ones may enjoy it, too.) Purchase a plain, light-colored tablecloth of the paper variety. Avoid the type that has plastic coating - cheap paper works best. Then, set out markers and crayons (be sure the markers won't run through the tablecloth) for everyone to decorate the table before dinner. It’ll make a pleasing sight while eating. Try adding some order to the decoration. Have each person decorate his/her place setting. Draw placemats at the seats and have each person sign his/her name and decorate the “placemat.” If you’re brave, purchase a plain cloth tablecloth and Sharpie markers. Then, ask each guest to sign the tablecloth and write what he/she is thankful for, or a message to the hostess. It’ll make a nice keepsake for each year, and it can be washed without losing the signatures. (If only the same could be said about the gravy stains!)

Whatever you do to make your dinner times more pleasant, always remember to include everyone into your night whether it be small children or your best friend who is really uncomfortable in a formal setting. There is always a middle ground, and the last thing you want is a guest wondering how to behave instead of enjoying the wonderful meal the way it was meant to be.