Contact us for all your culinary needs

Phone Number:
(780) 289-7220
Email: bolasterscatering@telus.net

Follow us for daily tips on Twitter & the Bolsters Catering Facebook page

Sunday, November 29, 2009

Tips for Christmas cookies & Baking

Tis the season to start thinking about baking Christmas cookies, breads, and other delectable treats for giving and eating yourself. Are you looking to get started baking, or just looking for ideas on how to make your baking life easier. You don't need to be as prolific in your baking as my wife and I to enjoy baking for Christmas, as baked goods can be an enjoyable and affordable gift for the masses. Here are a few tips, for novices and experienced bakers alike, to put you on your way to the wonderful smells of Christmas.

Start early - even if you don't make as many cookies or candies as we do, starting early is a good idea for a couple of reasons: one, the cookies can be frozen and taken out as needed for gifts or parties; and two, you may discover one or two batches isn't enough and need to make more.

Use your freezer - cookie doughs can be made and frozen for up to three months. Cover and package dough in airtight containers or resealable bags; when you're ready to bake, thaw the dough in the refrigerator.

Shop early - scan your grocery ads and coupon inserts for great deals. Many stores start running specials on baking products in early November, so scan your recipes and make your shopping list of ingredients.

Have a "go-to" recipe - this may take much experimenting, but if you have that one recipe that people love, it'll be a great gift to present at the holidays.

For "messy" cookies, use parchment paper - one of my mom's special cookies is the classic "jelly fold," which tends to get messy with jelly spilling out of the ends. Using parchment paper to line your cookie sheets is a great idea for these types of cookies, as clean-up is simple - throw it out.

Use aluminum baking sheets for cookies - aluminum distributes heat evenly, and cuts down the chance of burning the bottoms of your cookies.

Try a "one-dough, many-ways" cookie recipe - these easy recipes are great for someone who is just starting to bake or is short on time. The basic cookie dough is the same for each type of cookie, and you just add a few ingredients to change up the taste or texture of the dough. This is an economical method as well as easy - since the basic dough is always the same, you will have these ingredients in your pantry.

Create a cookie platter - as mentioned earlier, baked goods make wonderful gifts at holiday time. Invited to a party? Make up a festive tray of cookies, either to pass or as a hostess gift. Check party stores for affordable yet elegant serving trays, or use a heavy-duty plastic dinner-sized plating heaping with cookies.

Saturday, November 28, 2009

How to Roast Chestnuts by an open fire

When Jack Frost is nipping at your nose, there's nothing to be done but gather around the hearth and roast chestnuts in your cozy living room.
  1. Choose a utensil that has a long handle such as a frying pan

  2. Step 2

    Clean dirt off of chestnuts.

  3. Step 3

    Cut an X into the shell of each chestnut with a paring knifeto avoid a build up of steam inside the nuts.

  4. Step 4

    Place chestnuts in pan and cover.

  5. Step 5

    Roast over the coals of an open hearth for 15 to 25 minutes or until the chestnuts are tender and the shells are beginning to open.

  6. Step 6

    Peel chestnuts when they are cool enough to handle and serve with salt if desired.

Things You'll Need:
  • firewood
  • Chestnuts
  • Salt
  • Salt
  • Frying Pan With Lid
  • Oven Mitts
  • paring knife
  • Oven Mitts
  • Salt
  • Salt
  • Oven mitts
Tips & Warnings
  • Use dry, firm chestnuts, because soft chestnuts may be rotted.
  • Don't use a nonstick pan; these can't tolerate direct heat.
  • Be sure to remove the inner skins from the chestnuts as well as the shells.
  • Chestnuts that have not been cut or pricked to allow steam to escape may explode even after being removed from the heat.
How to roast chestnuts in the oven

Longing for something a little different over the holidays? All you have to do is just follow some brief and simple steps, and you’re well on your way to enjoying a cozy, storybook-style winter's night and warm up with some traditionally toasty chestnuts.

  1. Preheat the oven to 425 degrees F.

  2. Step 2

    Clean off chestnuts.

  3. Step 3

    Use a sharp paring knife to cut an X into one side of each chestnut, or prick chestnuts with a fork to allow steam to escape.

  4. Step 4

    Arrange chestnuts on a baking sheet or in a shallow pan, with the cut or pricked sides up.

  5. Step 5

    Roast in oven for 15 to 25 minutes, or until chestnuts are tender and easy to peel.

  6. Step 6

    Peel the nuts when they are cool enough to handle, and enjoy.


Tips & Warnings
  • Use dry, firm chestnuts; soft chestnuts might be rotted.
  • Try a little salt on your chestnuts.
  • Be sure to remove the inner skins as well as the shells.
  • Chestnuts that have not been cut or pricked to allow steam to escape may explode, even after being removed from the heat.

Sunday, November 22, 2009

A variation on a traditional Shortbread

The smell of shortbread signals the start of the holiday season!

The tender and crumbly straw colour biscuit, known as shortbread, is a staple of the holiday season. Originating in Scotland, the classic recipe consists of sugar, butter and flour mixed together and placed into a round mold.

Today, variations on the traditional recipe include the addition of extracts, chocolate, nuts, fruits or citrus zest, but during the holiday season, it's usually the traditional recipe that we return to. We offer you one of our favourite recipes for traditional shortbread.

  • 1/2 pound butter
  • 1/2 cup brown sugar
  • 2 cups sifted all-purpose flour
  • Superfine sugar, for dusting

Combine butter and sugar. Gradually add flour until blended. Divide dough into two equal pieces. Press one portion into the shortbread mold. Bake in preheated 350F oven until golden, approximately 25 minutes. Cool for 10 minutes. Loosen edges with a knife and gently turn cookie out. Sprinkle warm cookie with superfine sugar and cut into wedges. Cool the mold completely before baking second wedge. Cookies can be frozen in airtight container for up to 2 months.

Friday, November 20, 2009

the Nanaimo Bar

A holiday classic and one that almost everyone has a recipe for, yet there is always the opportunity to try the new and vary our traditions from time to time. The following recipes are reported to be the BEST and there are a few variations on the original. If you have a family favorite, please send it along and it will be included here. Everyone knows that these bars have zero calories during Christmas Time!

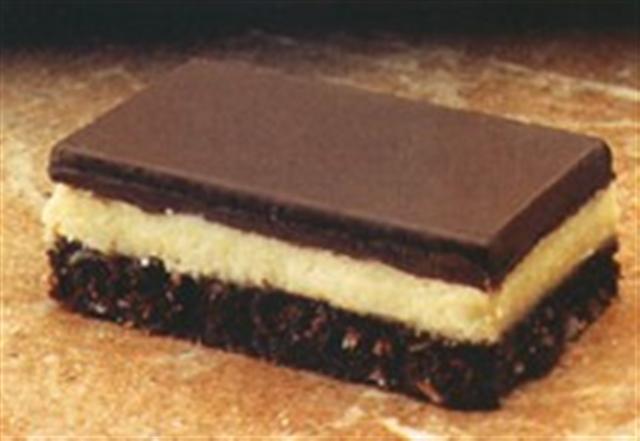
The Original Nanaimo Bar

Ingredients:

***Bottom Layer ***

* 1/2 cup unsalted butter (European style cultured)
* 1/4 cup sugar
* 5 tablespoons cocoa
* 1 egg beaten
* 1 1/4 cup graham wafer crumbs
* 1/2 cup finely chopped almonds
* 1 cup coconut

***Second Layer ****

* 1/2 cup unsalted butter
* 2 tablespoons cream PLUS
* 2 teaspoons cream
* 2 tablespoons vanilla custard powder
* 2 cups icing sugar

***Third Layer ***

* 4 squares semi-sweet chocolate (1 oz. each)
* 2 tablespoons unsalted butter

Directions:

Bottom Layer

Melt first 3 ingredients in top of double boiler. Add egg and stir to cook and thicken. Remove from heat. Stir in crumbs, coconut, and nuts. Press firmly into an ungreased 8" x 8" pan.

Second Layer

Cream butter, cream, custard powder, and icing sugar together well. Beat until light. Spread over bottom layer.

Third Layer

Melt chocolate and butter overlow heat. Cool. Once cool, but still liquid, pour over second layer and chill in refrigerator.

This recipe for Nanaimo Bar (Official) serves/makes 24 bars.

The Cranberry Nanaimo Bar


Ingredients:

***BASE***

* 1/2 cup butter, softened
* 3 squares semi-sweet chocolate
* 2 tablespoons granulated sugar
* 1 egg
* 2 cups graham crumbs
* 1 cup Angel Flake Coconut
* 1 tablespoon grated orange rind

***CRANBERRY LAYER***

* 1/4 cup whole cranberry sauce, finely chopped
* 1 tablespoon orange liqueur or orange juice

***CUSTARD LAYER***

* 2 tablespoons custard powder
* 3 tablespoons milk
* 1/4 cup butter, softened
* 2 cups icing sugar

***CHOCOLATE LAYER***

* 4 squares semi-sweet chocolate, chopped
* 1 tablespoon butter

Directions:

Base: Melt butter with chocolate and remove from heat. Stir in sugar and egg. Add crumbs, coconut and orange rind; mix well. Press into 9" square pan. Chill

Cranberry Layer: Combine cranberry sauce and liqueur. Spread evenly over base. Custard Layer: Combine all ingredients and beat until smooth. Spread over base. Chill.

Chocolate Layer: Melt chocolate and butter over low heat or in microwave on med. power for 2 minutes, stir until melted. Spread evenly over filling. Chill. Let stand at room temperature for fifteen minutes before cutting into bars.

To store: Store in refrigerator for up to 2 weeks before cutting.

To freeze: For longer storage, freeze bars before topping with chocolate and cutting. Thaw and spread with melted chocolate.

This recipe for Cranberry Nanimo Bars serves/makes 36 bars.

The Orange Nanaimo Bar


Ingredients:

* 2 cups Graham wafer crumbs
* 1 cup Coconut, unsweetened, flaked
* 1/2 cup Pecans; toasted, chopped
* 2/3 cup Butter
* 1/3 cup Cocoa powder; unsweetened sifted
* 1/4 cup Sugar, granulated
* 1 Egg; beaten

***GRAND MARNIER LAYER***

* 2 cups Icing Sugar
* 1/4 cup Butter; softened
* 1/4 cup Grand Marnier;or orange liqueur
* 1 tablespoon Orange rind; coarsely grated

***CHOCOLATE TOPPING***

* 1 tablespoon Butter
* 4 ounces Semisweet chocolate; melted

Directions:

In bowl, stir together crumbs, coconut and pecans. In small saucepan, gently heat butter, cocoa and sugar until butter melts. Remove from heat; whisk in egg. Blend into crumb mixture. Press into greased 9 inch square cake pan. Bake in 350F oven for 10 minutes. Let cool on rack.

Grand Marnier Layer: In bowl, place half of icing sugar with butter, mix in half of the icing sugar with butter; mix in Grand Marnier, remaining icing sugar and orange rind. Spread over base.

Chocolate Topping: Stir butter into chocolate until melted; spread evenly over Grand Marnier layer. Let cool for 20 minutes in refrigerator; cut into bars. (Bars can be covered, refrigerated up to 2 weeks, or frozen up to 2 months. Let soften slightly before serving.

This recipe for Orange Nanaimo Bars serves/makes 24.


Cherry Almond Nanaimo Bar

Ingredients:

***Base***

* 1/2 cup Butter
* 1/4 cup Sugar
* 1/3 cup Cocoa
* 1 teaspoon Vanilla
* 1 Egg -- beaten
* 1 cup Coconut -- desiccated
* 1 3/4 cup Graham wafer crumbs
* 1/2 cup Almonds -- chopped

***Filling***

* 1/4 cup Butter -- softened
* 1 tablespoon Cherry juice
* 2 cups Icing sugar
* 1/3 cup Maraschino cherries -- chopped

***Top***

* 2 ounces Semisweet chocolate
* 1 tablespoon Butter

Directions:

Base: Cook butter, sugar, cocoa, vanilla & egg in saucepan over low heat heat, stirring constantly until custard begins to thicken. Remove from heat and stir in coconut, crumbs and almonds. Pat firmly into a greased 9 pan inch square pan. Chill for 1 hour.

Filling: Cream butter, cherry juice and extract.

Gradually beat in icing sugar to a make a smooth spreading consistency. Stir in cherries. Spread over base and chill until firm.

TOP: Heat chocolate and butter, stirring until smoothly melted. Drizzle chocolate over filling.

Chill. Cut into bars.

This recipe for Cherry Almond Nanaimo Bars serves/makes 30 bars.

Thursday, November 19, 2009

Stollen

Well folks as promised it is time to turn or thought to the Holiday season and that means Christmas baking! I wanted to set us off on the right foot with something a little more challenging. As well as something a little different for most people. This is a wonderful bread and a great tradition.

Stollen or Christstollen is a tradition dating back to 14th century Germany.

Germans baked stollen loaves at Christmas to honor princes and church dignitaries, and to sell at fairs and festivals for holiday celebrations.

Early stollen loaves were made as bread without milk or butter because the Catholic church did not allow these ingredients during advent. In the mid 17th century, a papal proclamation allowed stollen bakers to add milk and butter.

Stollen

Yeilds: 2 loaves

Dry yeast 1 package

Warm butter 1/4 cup

Milk 1/2 cup Sugar 1/4 cup

Salt 1 tsp Shortening 2 tbsp

All purpose flour 2 1/2 cup

Chopped nuts 1/4 cup

Eggs 1 Raisins 1/4 cup

Currents 1/4 cup

Candied citron 1/4 cup

Candied cherries 1/4 cup

Melted butter 2 tbps

Icing sugar As needed

Soften yeast in water. Scald milk. Add sugar, salt and add shortening and cool to luke warm. Add 1 cup flour and mix well. Add softened yeast and egg. Beat well, stir in raisins, currents, citron, and cherries. Add more flour to make a soft dough. Turn out on a lightly floured board and knead until smooth and satiny. Place in a greased, cover and let rise until doubled in size (about 1 1/2 hour). Lightly punch down the dough and shape into two balls. Let rest for 10 minutes, then flatten into an oval sheet about 3/4 inch thick. Brush one half of sheet with melted butter. Fold over with large parker house rolls style. Place on a greased baking sheet. Brush lightly with melted butter. Let rise until it has doubled, about 45 minutes. Bake in oven at 350 degrees Fahrenheit for about 25 minutes. When cool brush with icing sugar and sprinkle with chopped nuts.


Wednesday, November 18, 2009

The Classic Grey Cup Game party


DRESSING UP YOUR GREY CUP PARTY

Creating a fun Grey Cup atmosphere is easy to do, and worth the effort. Here are a few ideas:
• Encourage guests to come dressed in their favorite team colors or to wear football jerseys.
• Wear a referee striped jersey as the host.
• Decorate your party room with tablecloths, shirts, jackets, hats and other paraphernalia in team logos or team colors.
• Add team and player posters, football equipment, pennants, and photos.
• Use white tape or chalk to mark off the yard lines from the curb to your front door—this is also a fun activity to do with the kids.
• Cover chair backs with team jerseys. Unless you are a huge CFL fan it may be hard to cover all the chairs with team jerseys, but even a few sports jerseys add to the atmosphere.
• Welcome your guests to the party by putting a sign over the door with your name as part of the Stadium name (i.e. Smith Stadium, James Field).
• Set up friendly football pools to encourage even the non-fans to become involved. Create pools based not only on the outcome of the game but also more random results, like total points, “random square” pools and even the coin toss.

FEEDING THE CROWD
No grid iron gathering would be complete without snacks. It’s a long game, though, so be prepared to offer up heartier fare for your football crowd—especially if you are serving alcohol. Fun food serving ideas:
• Design a buffet to resemble a concession stand to dispense the food and/or drinks.
• Use items like football helmets, shoulder pads, etc. to hold baskets or bowls of food. (You might want to clean them first!)
• Try Astroturf on your buffet instead of a tablecloth.

Sweet & Sour orange glaze wing sauce
Yields 2 lbs wings

Orange marmalade 1/2cup
Rice vinegar 2 tbsp + 2 tsp
Soy Sauce 1 tbsp
Thai chili sauce 1 1/2 tsp

Season and grill wings, about 20 min. In a small bowl, whisk all ingredients. Toss with grilled wings.

GREAT CANADIAN DRINKS

Football and beer always go well together, but in staying with the Canadian theme, try offering up some Caesars. The Caesar is actually a Canadian invention: It was developed in Calgary, Alberta, in 1969 by bartender Walter Chell to mark the opening of a new restaurant, "Marco's." Its popularity has grown and it is estimated that 250 million Caesars are sold every year.

Caesar Tip Caesars are “pitcher-friendly,” and the ability to mix a pitcher of Caesars makes hosting your party even easier. To help ease that November chill, leave a bottle of TABASCO® beside the bar for those who want some extra spice.


Classic Caesar Punch Recipe
• 6 oz vodka
• 36 oz of Clam Tomato Cocktail
• 1 tsp TABASCO® Sauce
• 1 tbsp Worcestershire Sauce

Mixing instructions
Add all ingredients to a large pitcher and stir to mix. 
Rim glass with lime juice and rimmer. Fill glass with ice and pour. Garnish with celery and lime wedges. Makes eight 6-oz Caesars.

Friday, November 13, 2009

Tin Foil Dinner Recipes

Tin foil dinners offer a great way to get your kids involved in preparation and cooking. There's nothing quite like packing up your food and then sitting back and relaxing while your grill or fire goes to work.

Tossing together ingredients and wrapping them in aluminum foil began as a camping ritual. It was an easy way to store, prepare and cook food when utensils and supplies were at a minimum.

Today, many enjoy the moist, easy to prepare dinners at home. There are no set rules when it comes to foil dinners, so be creative! If you have children, allow them to pack and prepare their own meal.

TIPS AND TRICKS

Every foil dinner needs a natural source of moisture. Onion slices, soups, a dab of butter, an ice cube, salad dressings or even a spoonful of water will help keep your dinner moist and fresh.

One alternative for lining your dinner is with lettuce or cabbage leaves before placing it in the foil wrapper will not only provide moisture and flavor, but also prevent burning.

Always line dinners with two layers of heavy duty aluminum foil with wet paper towel in between the layers and wrap tightly.

Use your favorite soups. Adding a few tablespoons of Cream of Mushroom soup gives a whole new flavor to an old favorite.

NEVER cook on open flames. Add tightly sealed packets to charcoal, hot coals or a stove. Open flames may cause your package to rip, tear or explode.

GENERAL GUIDELINES
Cooking times depend largely on the amount of heat provided and the size of the packet. As a general rule, a single packet of hamburger and vegetables takes 15 minutes and a chicken packet takes 20-25 minutes. Never undercook.

STUFFED TROUT
1 Medium sized Trout
Onion slices
2T Butter or margarine

Clean fish and salt and pepper its insides. Fill each fish 3/4's full of onion slices. Wrap each fish separately in two layers of heavy duty foil, topping each with 2 tablespoons of butter or margarine. Bury in hot embers or on grill coals for 20-25 minutes.

QUICK BREAKFAST
1 Sausage patty
1 potato, thinly sliced or
1/2c Hash Brown potatoes
2T Water
1 Egg
Salt and pepper to taste

Wrap all ingredients in double foil and top with spices and water. Place on hot coals or in oven for 10-15 minutes.

MEAT & POTATOES
1 Hamburger patty
1 potato, sliced thinly
2 Carrots, sliced
1 Onion, sliced
2T Butter
Garlic salt to taste

Cut all ingredients and place in double layer of heavy duty aluminum foil. Top with pat of butter and garlic sauce. Place in hot coals, in grill or oven for 15-20 minutes.

STEAK TO GO

1/2lb. Chuck or Sirloin steak
1 potato, sliced
Salt and pepper to taste
1/2c Cream of Mushroom soup
1/2 can Cream of Corn
2T Butter
Onion slices

Place meat in double layer of aluminum foil and top with a layer of thinly sliced potatoes. Salt and pepper to taste. Add Cream of Mushroom soup and Cream of Corn. Top with pat of butter and thin layer of onions. Wrap tightly and place over coals, cooking for 20 minutes, or until meat is tender.

SPICY PORK CHOPS

1 Medium sized Pork chop
1 Red potato, sliced
1 onion, sliced
2 carrots, sliced
Heinz 57 sauce (or similar)
2T butter
Garlic sauce

Add pork chop to double layer of aluminum foil. Top with thin layer of spicy sauce. Add carrots, potatoes, onions and dab of butter. Sprinkle garlic sauce and add an additional 2 tablespoons of spicy sauce. Cook 25-35 minutes, or until pork is thoroughly cooked.

BONELESS CHICKEN

1 Medium sized boneless chicken breast
1 potato
Onion
1 tomato, sliced
1 Bell pepper, sliced
BBQ sauce

Place boneless chicken breast on double layer of foil. Top with one tablespoon barbecue sauce. Add remaining vegetables and salt and pepper to taste. Top with dab of butter and liberal amount of barbecue sauce. Cook 25-30 minutes on hot coals, in oven or in grill. Meal is done with chicken's juices run clear.

Friday, November 6, 2009

Beef barley soup

Between the leanness of the beef and the health benefits of all the vegetables and barley, this dish is pretty high on the list of healthy things to have for supper. While I was thinking this recipe over I tried to come up with one that would meet as many dietary requirements as I could without ruining the dish's potential health benefits.

3 Tbsp olive oil
3 lbs lean beef chuck roast, trimmed
of excess fat
1/4 cup flour
1 tsp salt
2 tsp freshly ground black pepper
1 tsp each oregano, tarragon, thyme and basil
1 onion, finely chopped
1 clove garlic, minced
4 Roma tomatoes, finely chopped
1 lb mushrooms, sliced
1 red bell pepper, chopped fine
1/3 cup finely chopped celery
1/2 lb carrots, sliced 1 inch thick
4 cups beef broth
1 cup dry white wine
1/2 cup tomato juice
2 cups barley

In a bowl combine flour, salt, pepper and seasonings. In a large Dutch oven heat olive oil over medium high heat. Cut beef into 2 inch cubes and dredge in seasoned flour, shaking off excess. Add beef to oil in batches and cook until well browned on all sides. Remove to a bowl and set aside.

Reduce heat to medium and add onions and mushrooms. Cook, stirring occasionally until golden brown. Remove and set aside. Add tomatoes, garlic, celery and bell pepper. Cook, stirring occasionally 5-10 minutes, or until softened.

Return beef and onion to the pot and stir to combine. Add broth, wine, tomato juice and barley. Raise heat and bring to a boil. Reduce heat, cover and simmer 2.5 hours or until beef is fork tender and vegetables have disintegrated into the sauce.

Add mushrooms and carrots and simmer 1/2 hour more until carrots are cooked. Taste and adjust seasonings as necessary and serve hot with a loaf of your favorite crusty French or Italian bread.

Tuesday, November 3, 2009

Creamy Sweet Corn Soup


I wanted to edit things down and make a soup that captured the pure essence of sweet corn. I also lightened up the recipe by using skim milk instead of the heavy cream that usually goes into soups like these. Believe it or not, this didn't really compromise the usual velvety texture as much as you'd think. What's my secret? Pureeing the corn, straining the soup, then letting it simmer for an additional 30 minutes gives it a very satisfying richness--without any added fat!

This recipe involves making a "corn cob stock" instead of using more traditional vegetable or chicken stock. I wanted to squeeze every last kernel (pun intended!) of flavor from the corn cobs instead of just tossing them in the trash. It doesn't take that much extra time or effort and the added step is well worth it. Besides, this stock smells heavenly and shows off the sweet goodness even before adding the corn kernels, so please set aside 30 minutes to make it!

This basic sweet corn soup is perfect as is, but can also be a base for whatever additions you like.

Corn Chowder: add potatoes and bacon
Cajun Corn Soup: add green peppers, celery and sausage
Mexican Corn Soup: cilantro, lime, chicken, tomatoes, green chiles

Creamy Sweet Corn Soup
Serves 2-3

2 Tbsp unsalted butter
2 Tbsp olive oil
1/2 yellow onion, chopped

1 clove garlic, minced

1/4 cup all-purpose flour

6 ears fresh sweet corn

4 cups water

2 cups skim milk

salt and pepper


1. Shuck corn and cut kernels from the cobs and set aside cobs and kernels in separate bowls.


2. Saute onion in butter and garlic on low until translucent, about 10 minutes. Add garlic and cook for an additional two minutes. Add flour and stir constantly for about 4 minutes--do not let it brown--then whisk in the water and milk slowly to avoid lumps. Add the corn cobs (but not the kernels) and let simmer for about 30 minutes to get all of the flavor from the cobs.


3. Remove the corn cobs, add in the corn kernels and let simmer for about 10 minutes.

4. Puree the soup with an immersion blender, then strain soup and return to the pot.

5. Add more milk as needed, depending on how thin you like your soup. If you have time, it's best to let the soup simmer for an additional 30 minutes with the lid off.

6. Garnish with your choice of fresh herbs and other accompaniments and serve. (I garnished the soup with a squeeze of fresh lime juice and chives and served it with a side of toasted whole wheat tortilla strips seasoned with chili powder, cumin, paprika and salt.)


Optional Accompaniments:

lime

scallions or chives
cilantro
seasoned and toasted wheat tortilla strips
avocado

sauteed corn
sour cream
cheese

Monday, November 2, 2009

Chicken Noodle Soup


Don't let the production of a stock through you off. If need be you can use the tetra pack chicken broth from any grocery store. But nothing that gives that fall homey feel like a chicken stock simmering on a back burner throughout the day, adding to the anticipation of the meal. Additionally I love spending time in the Kitchen, it is important to slow our family's down, spend time together, laugh and love together.

Yields: 4 servings

Ingredients

  • 2 tablespoons extra-virgin olive oil
  • 1 medium onion, chopped
  • 3 garlic cloves, minced
  • 2 medium carrots, cut diagonally into 1/2-inch-thick slices
  • 2 celery ribs, halved lengthwise, and cut into 1/2-inch-thick slices
  • 4 fresh thyme sprigs
  • 1 bay leaf
  • 2 quarts chicken stock, recipe follows
  • 8 ounces dried wide egg noodles
  • 1 1/2 cups shredded cooked chicken
  • Kosher salt and freshly ground black pepper
  • 1 handful fresh flat-leaf parsley, finely chopped

Directions

Place a soup pot over medium heat and coat with the oil. Add the onion, garlic, carrots, celery, thyme and bay leaf. Cook and stir for about 6 minutes, until the vegetables are softened but not browned. Pour in the chicken stock and bring the liquid to a boil. Add the noodles and simmer for 5 minutes until tender. Fold in the chicken, and continue to simmer for another couple of minutes to heat through; season with salt and pepper. Sprinkle with chopped parsley before serving.

Chicken Stock:

  • 1 whole free-range chicken (about 3 1/2 pounds), rinsed, giblets discarded
  • 2 carrots, cut in large chunks
  • 3 celery stalks, cut in large chunks
  • 2 large white onions, quartered
  • 1 head of garlic, halved
  • 1 turnip, halved
  • 1/4 bunch fresh thyme
  • 2 bay leaves
  • 1 teaspoon whole black peppercorns

Place the chicken and vegetables in a large stockpot over medium heat. Pour in only enough cold water to cover (about 3 quarts); too much will make the broth taste weak. Toss in the thyme, bay leaves, and peppercorns, and allow it to slowly come to a boil. Lower the heat to medium-low and gently simmer for 1 to 1 1/2 hours, partially covered, until the chicken is done. As it cooks, skim any impurities that rise to the surface; add a little more water if necessary to keep the chicken covered while simmering.

Carefully remove the chicken to a cutting board. When its cool enough to handle, discard the skin and bones; hand-shred the meat into a storage container.

Carefully strain the stock through a fine sieve into another pot to remove the vegetable solids. Use the stock immediately or if you plan on storing it, place the pot in a sink full of ice water and stir to cool down the stock. Cover and refrigerate for up to one week or freeze.

Yield: 2 quarts

Sunday, November 1, 2009

Mulligatawny Soup

As the weather gets chillier, soup becomes so appealing: a steaming, fragrant welcome to a warm home.

Mulligatawny -- a mixture that originates with the Tamils of southern India -- is such a great soup at this time of year. It's spicy and slightly exotic, but is based on chicken broth, garlic and onions -- ordinary ingredients that seem to have exceptional abilities to ward off the chill, as well as colds and flus. Serve this one hot--and with a lot of showmanship--to 4-6 people.

Add turkey or chicken to the pot to make it even more substantial. Serve it with warm naan or crunchy pappadams and you've got a wonderful, easy weeknight supper.


• 2 Tablespoons butter or olive oil
• 2 stalks celery, chopped
• 1 carrot, peeled and chopped
• 1 large onion, peeled and chopped
• 1 chile pepper, seeded and deveined (your choice: banana, poblano, jalapeno, habanero--whatever you can stand)
• 4 cups chicken stock
• 1/4 cup lentils
• salt and pepper to taste
• 1 Tablespoon curry powder
• 1/2 cup coconut milk* or whipping cream
• 1-2 cups cooked rice (preferably basmati)
• 1/2-1 cup shredded cooked chicken (you can cook raw chicken in the stock at the start if you don't have leftover chicken lying around)
• 1/2 cup tart raw apple, chopped fine

Garnish: spoonsful of extra cream or coconut milk--and minced cilantro or parsley.
Saute the celery, carrots, onion, and pepper in the butter at a low heat until the onion is translucent. Stir in the curry powder to blend and cook for a minute. Pour in the stock, add the lentils (and chicken, if it's raw), and bring to a boil. Reduce heat and simmer for 30 minutes.
While the soup is simmering, get the rice cooked (if it isn't already); likewise with the chicken. Then shred the chicken and chopped the apples finely. You don't need to skin the apples.
When the soup is done, season to taste with the salt and pepper, then puree, solids first, in a blender. Return to pot.

When ready to serve, bring the soup to a simmer and add the coconut milk or cream. Take the pot to the table, as well as individual bowls of warm rice (heated in the microwave, if necessary), shredded chicken, finely chopped apple, coconut milk (or cream), and minced cilantro (or parsley).

To serve, have big individual serving bowls at the ready. Spoon rice into each bowl (flat soup bowls are nice here)--then pile on a big spoonful of chicken and a spoonful of apple. Ladle the soup on top, then drip coconut milk/cream into the center and swirl--and sprinkling with fresh cilantro and parsley.